HOW DO I HANG WALLPAPER IN A BATHROOM

Here’s some useful tips if you want to have a go at it yourself.
Decorating a small bathroom is indeed a unique challenge, but it's also an opportunity to experiment with daring designs and create a standout space.
When space is limited, every detail counts, making wallpaper an excellent tool for making a big impact in a small area.
Here are some tips and ideas on how to use wallpaper effectively in small bathrooms:
- Choose Bold Patterns: In small spaces, bold patterns can create a focal point and add a lot of personality without taking up physical space. Geometric shapes, large florals, or abstract designs can serve as artwork and transform the entire feel of the room.
- Opt for Light and Bright Colours: Light colours can make a small space feel bigger and brighter. Wallpaper with light backgrounds or pastel colours can help reflect light, making the bathroom appear more airy and spacious.
- Consider the Scale of the Pattern: While bold patterns are encouraged, the scale of the pattern should be considered. Sometimes, larger patterns can make a small space feel chaotic if not balanced with simpler elements in the decor. Conversely, small, detailed patterns can create a sense of texture and depth without overwhelming the space.
- Accent Walls: If papering the whole bathroom seems too much, consider just an accent wall. This can be the wall you face when entering or another strategic spot. This approach draws the eye and creates a focal point without overwhelming the space.
- Play with Textures: Textured wallpapers can add depth and interest. For instance, a grasscloth wallpaper provides a tactile surface that can warm up the bathroom and complement other elements like metal fixtures and mirrors.
- Coordinate with Fixtures and Fittings: When selecting wallpaper, consider how it will coordinate with your existing or planned fixtures and fittings. Metallic elements, wood tones, and glass features can all be complemented by the right wallpaper.
- Waterproofing Considerations: Ensure that the wallpaper is suitable for humid conditions. Vinyl wallpapers are generally more resistant to the effects of moisture and can be a safer choice for bathrooms.
- Mirrors and Lighting: Combine your wallpaper choice with strategic lighting and mirrors to enhance the effect. Mirrors can amplify light and patterns, making the space feel larger, while good lighting will highlight the wallpaper’s design.
By carefully selecting and positioning wallpaper, even the smallest bathroom can be transformed into a stylish and inviting space. This approach allows for creativity and personal expression in a room that is often overlooked during home decorating projects.
Prepare your walls thoroughly
Preparing your walls thoroughly before applying wallpaper in a bathroom is essential for a smooth and lasting finish.
Each step in the preparation process is designed to ensure that the wallpaper adheres properly and looks great for years to come.
Here’s a detailed look at each step:
- Cleaning the Walls: Start by wiping down your bathroom walls with a damp cloth or sponge to remove any dust, dirt, or grime. Pay special attention to removing any splatters, toothpaste residue, and other common bathroom stains. For tougher stains, you might need to use a mild cleaning solution. After wiping, use a vacuum with a brush attachment to ensure all loose debris is removed. This step is crucial for creating a clean surface that will allow the wallpaper adhesive to bond effectively.
- Removing Fixtures and Wall Plates: Take down any removable items such as screws, mirrors, nails, wall light fixtures, and light switch and power point plates. This will make the application of wallpaper smoother and ensure that the paper can go on uninterrupted by obstacles. Be sure to keep all screws and small parts in a safe place for reinstallation after the wallpapering is complete.
- Patching Holes: Inspect the walls for any holes or imperfections. Use filler plaster or spackle along with a putty knife to fill these in. Apply the filler smoothly and allow it to protrude slightly above the wall surface because it will shrink as it dries. Choosing the right filler material is important, as bathroom walls can be subject to more moisture and humidity than other parts of the home.
- Sanding the Walls: After the filler has dried completely, which usually takes a few hours depending on the product and environmental conditions, sand the patched areas with sandpaper attached to a sanding block. This helps achieve a smooth, flat surface. The sanding block provides an even pressure that helps avoid creating dips or gouges in the wall.
- Applying Wallpaper Primer: Once the walls are clean and smooth, it’s time to apply a wallpaper primer. This step is vital, especially in bathrooms where the adhesive needs extra help sticking to a potentially humid environment. Use a high-quality roller for large areas and a smaller brush for cutting in around edges and tight spaces. A good primer will seal the porous surfaces of your spackled areas and existing paint, providing a consistent surface for the wallpaper adhesive.
- Final Checks and Preparation: Before starting the wallpapering, do a final check to ensure all surfaces are completely dry and free of dust. Any moisture or debris can interfere with the effectiveness of the primer and the overall adhesion of the wallpaper.
By following these meticulous preparation steps, you ensure that the wallpaper will not only adhere better but will also have a smoother, more professional finish. Proper preparation also helps prevent issues like peeling or bubbling, which are more prevalent in high-moisture environments like bathrooms.
Using a measuring tape, measure the wall from ceiling to top of baseboards.
Transpose this measurement to first panel of wallpaper.
Ensure you add about 2.5cm allowance at the top.
Draw a straight line with a pencil and a clear ruler or square. This will enable you to get a straight line.
Next, cut along line with sharp scissors or use a Stanley knife.
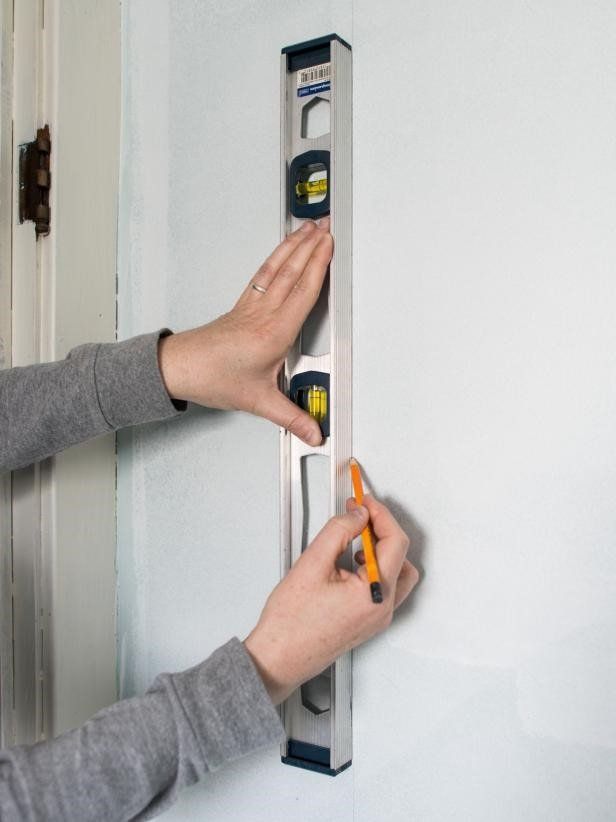
Determine the starting point on the wall of the first wallpaper panel.
Mark with a pencil. Then, using a pencil and a level, draw a straight vertical line.
Most walls and ceilings aren't level or square, so it is useful to use this plumb line as a guide when hanging the first piece of paper.
Useful Tip: When working with a repeating pattern, place the starting plumb line in the centre of the main wall, at a corner, or up against cabinetry.
If hanging a pattern or mural, start from left to right, or however it comes off the roll.
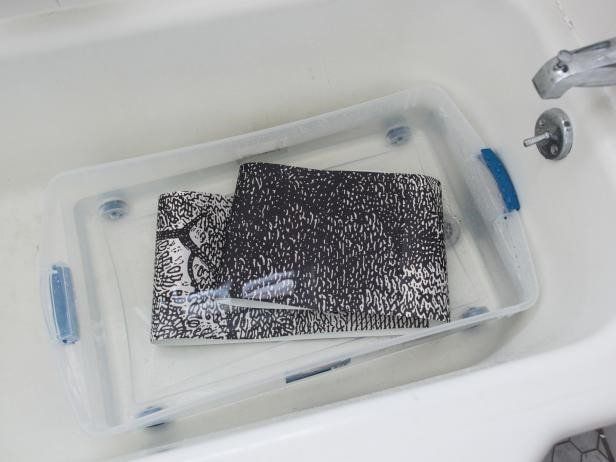
Fill your bathtub or a separate tub with enough clean water so the wallpaper can be submerged completely.
Holding the top and bottom sides of the wallpaper panel, fold each end to meet in the middle. Then fold each end, with the glued sides together, into the centre again to "book" the paper.
Push booked paper into water until it is thoroughly covered. Ensure you read and follow the manufacturer's instructions for the time the paper should be submerged.
Once the correct time has passed, remove the paper from water and allow excess to drip off into tub. Unfold paper and press onto wall, lining up one edge with the previously pencilled line.
Most wallpaper paste will allow you to shift once applied to wall, to ensure proper placement and removal of bubbles and wrinkles.
Useful Tip: If you are working in a room with high walls, this is definitely a job where two people are better than one.
Once the paper is correctly positioned, smooth out any bubbles and wrinkles with a rubber smoother or wallpaper brush. Smooth out from the centre of the paper toward the edges, pressing out extra glue and air bubbles as you go. The excess will drip down the walls, so have an old towel at the ready on the floor to catch it.
Once smoothed, wipe paper's surface with a clean, damp cotton cloth or wallpaper sponge. Rinse the cloth or sponge and wring it out regularly to keep it clean.
Useful Tip: At this stage, the wallpaper will feel wet, but shouldn't be dripping or have visible glue on the surface.
In all the corners and near the ceiling and skirting boards, press a metal straight edge into corner and trim wallpaper to size using a sharp Stanley knife.
Useful Tip: If the knife is pulling the paper against the paper instead of cutting it, the blade is blunt and needs to be replaced. Make sure you have plenty of sharp blades on hand for this project.
When hanging wallpaper over a light switch plate, light fixture, outlet, sink, medicine cabinet, etc., it’s important you "dry fit" the paper prior to soaking in water to activate paste. With a small cut or pencil, mark where the fixture is located. Double check marks with measurements taken from the wall and then cut out the shape of the fixture with sharp scissors.
Be conservative with the cuts and work carefully to ensure accuracy.
Useful Tip: When working with wet hands around a live electrical outlet or switch, there is a danger of electrical shock, so ensure the power is turned off at the junction box before you start smoothing the wallpaper around those areas.
Continue by repeating steps 2-5 with next piece of wallpaper.
To be sure you get a great result, it's a good idea to measure again from the baseboard and ceiling, since walls and ceilings are usually not level, square or plumb.
The difference from one side of the room to another can be significant, especially in older homes. When cutting subsequent pieces of wallpaper, make sure you focus on the pattern or repeat. It's always better to be generous with the paper, as the paper can always be trimmed, but cannot be pieced back together without creating a seam.
When hanging around an interior or exterior corner, press paper into or around the corner with rubber smoother.
Make sure the wallpaper contacts the curves of the wall completely. Allow the paper to dry before replacing switch plates and fixtures.
Useful Tip: Most modern wallpapers are removable when used over wallpaper primers. Simply wet and peel off. Some can even be reused in another space.
Remember: If all of this seems to difficult or time consuming you can call us at Painting Newcastle. We will ensure your wallpapering job is done correctly and in a timely fashion.
You can relax and let the team at painters Newcastle do it right!